Tuesday, December 14, 2010

Our Chair is ready To Output

rendering of chair: Exploits both waffling and stacked contouring
Using Grasshopper to generate surfaces for the seat and base, we baked it into rhino.  In rhino we offset the surfaces and contoured them.  From this model we were able to create a laser cut file in cad.  After laying out the pieces we model them to check for continuity and any discrepancies.  Here are a few snap shots of what the final chair should look like, however we have made some slight modifications as to how the edge of the seat will look (no exposed rib ends).

Tomorrow we are outputting our chair at 1/2 scale.  It will roughly measure 15 inches tall.  It will be constructed out of 1/4" MDF and cut using the lasercutter.

Chair Rendering: Note the language of bent planes, one clearly defining the base and the other clearly defining the seat.

Sunday, December 12, 2010

Using Formulas to Generate a Base for Our Seat surface

Screenshot: Seat with Base
If cosine lends itself for deriving a desired seat section could a similar formula lend itself to creating a seat base?  We asked ourselves this question hoping to find an equation that could possible play the role of both seated surface and as a support.  After reverting back to high school algebra II/trig we were reminded that formulas with Asymptotes were similar to the section of our seat base.

Several attempts to finding a formula that would be appropriate for representing the points that defined our seat base brought us to polynomial functions.


A quartic function (x^4) has the right number of degrees necessary for providing the section we needed.  We once again used this formula with number sliders attached to the variables associated with this function to the derive the base height and width. 

Screenshot: Entire Script
Screenshot: Seat base Script

Now that we have a seat base using the x^4 function and a seat surface using a CosX function, it is important that these two surface will be able to intersect in a manner that will allow them to share curvature.   Our next step is to go into the Seat portion of our script and replace it with the X^4 function so that the two separate surface will have the same curvature at the place where they overlap.

Once we have successful achieved this we should be able to output this chair at 1/2 scale and then finally at 1:1.

Aligning Sections to Normals

In tour previous script version our cross-sections were not aligned to the normals of the seat profile section.  We were able to go into our exiting script and rotate the frames based on their relative angles.

Screen shot: Entire Script
Rotating the curves to normals

more editing of seat surface

Elevation showing the frames rotated to normals


Rotating each plane normal to the curve of the  section makes the shape of the seat surface smooth and minimizes irregular geometries when baking out form into rhino.

Outputting our first Prototype

Screenshot:  Rhino, Contoured surface

Lasercut file
Can the CNC become a frame or Armature?

What are the least amount of material needed?

fully assembled chair


Cardboard Chiar @ 1/4 scale

Appling An Equation to the Seat Cross Sections

Screenshot: Entire Script
Our next attempt utilizes a simple Cos(X) function to generate the cross section of the seat. Using the cosine function allows us to adjust the contour of the seat more rapidly than before, where we had to adjust each control point with an individual slider. With the cosine function we are able to adjust multiple points along a curve at once.


Screenshot: Start, Divides seat section into 8 nodes, places a frame and provides start point for each section curve
 When the cosine equations are created they automatically want to start at the origin in Rhino.  To relocate them to a specific start point we created a spline that represented our desired seat cross section in profile.  We then divided that spline into seven parts and placed a frame at these divisions.  extracting the x,y,z value at these intersections we were able to assign this as the origin for each equation, giving us an adjustable cosine curve at seven locations along the section of our chair.
Screenshot: Middle, Cosine equation Parameters, allows editing of curvature
 By editing the Amplitude, period and frequency of the COSX function, we are able to generate different seat depths and widths.  Seven of these functions are employed across the entire seat.  Variation to each equation changes the character of the chair from seat back to seat.


Screenshot: End, lofts curves and mirrors them to make the complete chair.
To generate a surface from this data we then take the curves generated from the Cos(x) function and loft them.  Because these curves only represent half of the chair we then mirror this surface to create a complete and symmetrical seat.

Screenshot: Seat with Seatback derived from 7 sections

This is what the seat looks like based on the script we have written.  Not bad.  You can already begin to see the making for a seat and a seat back.

We then begin to tweak the sliders associated with the cosine function and you can see how we are able to drive formal responses.  We will now be able to use rhino to help out put our first prototype.
Screenshot:  Editing Varibles for seat section Equation

Looking For a Better Solution

Gerard Petersen's Boat Hull Script
Looking through tutorials one day I stumbled upon a set of videos on Youtube demonstrating the use of Grasshopper to generate boat hulls.  The video demonstrated the use of parametric definitions to create a ships hull that is adjustable based on keel depth, displacement, and  stern vs. bow proportions.  I contacted the author of the video, Gerard Petersen, to get more information about how he structured his script for the boat.  He was kind enough to email us this script.  Max and I spent several hours examining and trying to make sense of this very complex script.  What we discover is that Gerard used an equation to define each specific cross section at certain intervals along the boats hull.  Then by assigning a number slider/inputs to the variables associated to each equation he is able to generate a parametric form that is very fluid and editable based on specific numerical input.

Gerard Petersen's Youtube Video

You can view this video @ http://www.youtube.com/watch?v=lbV9MllyP8I&feature=related

First Explorations with GrassHopper

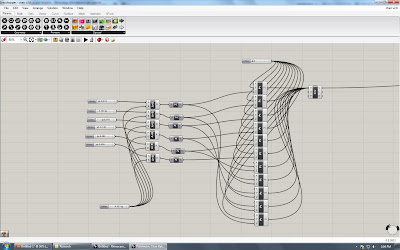
Screenshot: Entire script

Our first attempts with Grasshopper have been successful for the most part.  We have written a script that generates 6 points along the section of the seat.  These points are then copied along the length of the seat and mirrored(to maintain symmetry about the seat) creating a total of 12 points.  Each point's Z position can be edited by using a number slider.  Since all of these points are used to generate curve we can then use these curves to create a surface by lofting.  The end result was a seat surface.

The down side to this script is that it is really no different from just creating a nurb surface in Rhino and then editing each control point individually.  To refine the perfect curvature for this seat will take way to long to edit.  We are going to have to find a better way to make editing the seat curvature more fluid and responsive. 

Screenshot: Seat sections portion of the Script

Screenshot:  Point Isolated
Screenshot:  Exaggeration of editing one point along curve

More Sketching....


The above sketches are Max's exploration of a possible aesthetic for the chair based on  several constraints.  Since we are planning on outputting this chair on the CnC or Lasercutter, we are aware of a certain tectonic that is inherent of this process.  Dissatisfied with most chairs that are output on CnC/lasercutters, generally being waffle grids, we wanted to try and find a language that begins to move away from this construction technique. 

We are starting to discover that by creating a hierarchy of waffled pieces, larger for structure, smaller for infill, it begins to break down the redundancy of the waffling technique. 

Saturday, October 16, 2010

Testing out Constructibility of Design

Modeling in Rhino


Structure made of sanded ply wood covered in heat molded acrylic for Sheer stability and provides a continuos seating surface.  Seat back and Seat bottom connected using finger joints (waffle construction)

The Curvature and relationships of seat back to seat surface will be controlled with a definition made in grasshopper.  

Design Sketchs

Making progress.  Our posture research, store visits, along with completing several grasshopper tutorials has allowed us to move into schematic design phase.  Below are some sketches from both Max and I looking a what chair "language" and "style" would be most appropriate for using the CnC, sheet materials, and a parametric definition to execute.

Research sketches ( Posture and Qualities inherent of Chairs)


Research Sketches (Ideal proportions)

Sketches: Studies of techtonics

Sketches: Charette with Prof. Nancy Cheng

Sketches: Schematic Design.

A Visit to The Store

Max and I decided the best way to get a base line for our first chair iteration would be to sit in some chairs. We visited "Hive" and "Design within Reach"on Wednesday, two Downtown Portland Chair suppliers,  to get an Idea of what qualities a comfy chair should posses.  Below are some shots of the chairs we sat in (Max pictured).

Eames Chair: Seated all the way back felt ok


Eames molded Wood: Seated in a slouch position felt better


Eames Executive Aluminum Series:  Very Comfortable, Pivoting allows user to find best angle for back

Tom Vac Chair:  Low seat back made user feel like the might fall  out of chair


Unknown At this time: Very Comfortable, Angle between seat and seat back ideal.


Unknown at this time: Seat back height is at center of back (uncomfortable) construction, plastic,  felt weak.

Eames plastic rocker:  Seat height too low to find comfort via rocking back.  May have been more comfortable for shorter person.

Eames plastic: Comfortable when Slouched

Our trip to these stores made us aware of how finding comfort in a chair can be aided by a natural flexibility inherent in the construction materials.  Also the chair's ability to rock or slightly pivot can also help the user achieve comfort more easily.  Location of seat back height can prove negative if it falls at the center part of the seated persons back.  Chairs with higher seat backs gave user more confidence towards its integrity.   

Our trip also gave insight that owning any of these chairs in the near future is certainly out of the question.  A Barcelona lounger (not pictured) runs $4,500.  

Tuesday, October 5, 2010

First Investigation of Posture


We begin our quest of ergonomic response by asking the question:  What is Ideal Posture”.  It didn’t take long to find that this topic has a wide range of opinions.  A study at the University of Queensland asked participants to replicate four postures that were ideal for relieving strain on our lower backs while seated. When the individuals attempted to replicate these postures they were unsuccessful. This study speculates that we are incapable a sitting correctly and that it is something that has to be learned.  This brings up the question; can a chair promote proper posture through its design?

Other research shows that poor posture commonly referred to as slouching is not as bad as we may think.  This tendency to lean forward and adjust pressure to our lower tailbone and upper back is in response to the discomfort created from sitting at a ninety degree angle.  Levent Caglar from the charity BackCare had to say,

“As to what is the best angle between thigh and torso when seated, reclining at 135 degrees can make sitting more difficult as there is a tendency to slide off the seat: 120 degrees or less may be better.”

New concepts in seating suggest that the best and natural position for our spines to be at in is found when we are standing.  Chairs that provide support in a standing position keep the spine up right and evenly distributed pressure on our discs. This is known as (Lordosis), conversely Kyphosis refers to uneven pressure on our discs.

Lastly, in chapter 3 of Galen Cranz book, The Chair, she describes an “inherent instability” that is a result of poor sitting habits of western civilizations.  We start by sitting with our backs all the way in the chair.  This posture begins to fail as downward pressure in our hips redirects us into slouching position.  Slouching proves to be even more uncomfortable, leaving our lungs felt congested and our ribs digging into our stomachs.  We relieve this discomfort by correct our slouching only to find that we are now sitting without any back support, and thus move back to the original seated position.

These first investigation have made me aware of:

Seating Angle (ranges from 100-135 Degrees)
Importance of feet being flat on the ground while seated
Impossible to expect Humans to sit in same position for long periods of time
Correct posture may not be achievable through seating alone

Thursday, September 30, 2010

Fall 2010 Schedule

Week
Date
Schedule
1
9/27-10/1
Introduction & Preparation:
Finalize project intent and project schedule. Establish meeting schedule. Acquire and install software
2
10/4-10/8
Schematic Design/Ergonomics Research/Software Research:
Design & Research: Ergonomic studies begin to influence design concept development
Reading: The Chair: Rethinking Culture, Body, and Design, Galen Cranz
Tutorials: Rhino, Grasshopper
Blog: Weekly progress report via blog.
3
10/11-10/15
Schematic Design/Fabrication Research/Software Research:
Design & Research: Design concept refinement, establishment of object form based on ergonomics, response to the human form. Research digital fabrication methods.
Reading: Parametric: Algorithmic Architecture ; from Control to Design, Michael Meredith ; Generative Algorithms with Grasshopper, Zubin Khabaz
Tutorials: Rhino, Grasshopper
Blog: Weekly progress report via blog.
4
10/18 -10/22
Design Development/Tectonic Studies/Fabrication Research/Software Research:
Design & Research: Refinement of form based on selected method of construction (construction method based on previous weeks digital fabrication techniques research)
Reading: The Grasshopper Tutorial Manual, Andrew Payne ; Emergent Technologies and Design, Hensel, Menges, and Weinstock
Tutorials: Grasshopper, Rhino
Blog: Weekly progress report via blog.
5
10/25-10/29
Design Development/Tectonic Studies/Fabrication Research/Software Research:
Design & Research: Design modeled in Rhino and parametrized using Grasshopper
Fabrication: Prepare 3D model for output and begin output of prototype
Tutorials: RhinoCAM, Grasshopper
Blog: Weekly progress report via blog.
6
11/1-11/5
Design Development/Prototyping/Software Research:
Design & Research: Adjustments to model based on ergonomic feedback from prototype.  
Fabrication: Begin output of new prototype
Tutorials: RhinoCAM, Grasshopper
Blog: Weekly progress report via blog.
7
11/8-11/12
Design Development/Software Research/Prototyping:
Design & Research: Adjustments to model based on ergonomic feedback from prototype.
Fabrication: Output of a second prototype or tectonic study.
Tutorials: RhinoCAM, Grasshopper
Blog: Weekly progress report via blog.
8
11/15-11/19
Design Finalization/Prototping/Software Research:
Design & Research: Finalize design based on feedback from prototypes.
Fabrication: Begin fabrication of final product
Tutorials: RhinoCAM, Grasshopper
Blog: Weekly progress report via blog.
9
11/22-11/26
Design Finalization/Fabrication:
Design & Research: Finalize design based on feedback from prototypes.
Fabrication: Continue fabrication of final product
Blog: Weekly progress report via blog.
10
11/29-12/3
Fabrication/Documentation Assembly:
Fabrication: Finish fabrication of final product
Documentation: Assemble a presentation including drawings, models, and photographs to be submitted for review.
Blog: Weekly progress report via blog.

The Proposal


Fabricating Comfort: A parametric study of ergonomics

Intro:
As computer aided design continues to define the practice of architecture in the 21st century it is necessary for students entering the field to have a grasp on the potential of new software to generate and rationalize complex geometries while expediting the construction process. In recent years parametric modeling software has become an invaluable tool, integral in creating radical new forms that are evocative, functional, and capable of being output in an accurate and timely manner.

Project intent:
The objective of this research will be to explore parametric modeling through the lens of ergonomics by designing a “chair” that responds to the organic and irregular shapes of the human form. Additionally, this research will allow us to familiarize ourselves with parametric design, digital fabrication techniques, and the interplay of physical (output) and digital (input) through the editing process.

Methodology:
Our design process will begin with a qualitative investigation of the ergonomics of humans at rest. We will analyze a variety of conventional and non-conventional resting and sitting positions taking note of posture and comfort. Simultaneously we will be engaged in a quantitative investigation of digital fabrication methods, researching materiality, tectonics, and constructability. 

This research will inform our design by defining the posture and construction of the chair. Once we have derived the form and method of construction we will then be able to identify and prescribe a parametric order to a computer model. This parametric model will allow us to adjust the form of the chair in response to the human form through a series of test prototypes.

Overall Goals:
By taking the time to familiarize myself with modeling software and digital fabrication interface, it is my hope that we will begin to identify and develop useful strategies in both the design and post-production processes. The techniques we hope to gain from this investigation are valuable skills that are pertinent to our work in terminal studio.    


A) Sources:
Cranz, Galen. The Chair: Rethinking Culture, Body, and Design. New York: W.W. Norton, 1998. Print.

Meredith, Michael. Parametric: Algorithmic Architecture ; from Control to Design. Barcelona: Actar, 2007. Print.

Axel Kilian, Ph.D., Dipl.-Ing. Overview of Projects. Web. 11 Aug. 2010. <http://www.designexplorer.net/>.

"LaN / Live Architecture Network » about LaN / Contact." LaN / Live Architecture Network. Web. 11 Aug. 2010. <http://www.livearchitecture.net/lan-direction>.

Grasshopper tutorial Manual By Andrew Payne
www.liftarchitects.com

Generative Algorithms with Grasshopper by Zubin M Khabaz
www.morphogenesism.com

Michael Hensel, Achim Menges and Michale Weinstock’s Emergent Technologies and Design, Routledge, 2010

B) Meeting schedule: See Attached
We will meet weekly, on Wednesday mornings at 10am, during the quarter with professor Nancy Cheng and/or John Leahy, for progress reports and advisement.

C) Final Product
The products will include parametric digital model variants, joint studies /tectonic investigations, at least two full-scale constructions with a finished comfortable chair as the goal. A digital online portfolio will be assembled documenting this entire process from the research.


 Max E. Taschek + Matthew N. Byers